
- Joined
- Feb 5, 2024
- Messages
- 3,364
- Reaction score
- 7,406
- Points
- 113
- Website
- esso4k-tv.com
- vip
- 9,386 credits
Offline
esso4k submitted a new resource:
SMARTERS - WHMCS Smarters XUI.ONE Owner Billing Module V1.0.4 - ,
Read more about this resource...
1. Log in to our client area and download the module.
2. In the downloaded file you might find one or two packages that support different PHP versions. In the most recent versions of the module, you will find only one package that supports PHP 7.2 and later.
3. Extract the package and upload its contents addon will be uploaded to whmcs/modules/addons xui will be uploaded to whmcs/modules/servers
The content of the package to upload should look like this.
5. Click Activate.
6. Click Configure. eg: word or lol text or nulled only abcdefghjkk. License Key in, Check the box "Full Administrator" and click Save.

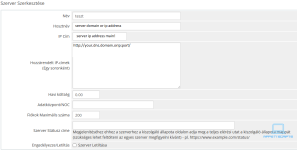
8. In order to create and configure a product, go to 'System Settings' → 'Servers'.
9. Click "Create New server" and click save.


10. In order to create and configure a product, go to 'System Settings' → 'Products/Services'.
11. Click "Create New Group" and click save.
12. Click "Create a New Product".
SMARTERS - WHMCS Smarters XUI.ONE Owner Billing Module V1.0.4 - ,
It is a user management plugin integrated with XUI.ONE that you can use for WHMCS CMS.
SMARTERS - WHMCS Smarters XUI.ONE Owner Billing Module V1.0.4
After the payment, you can automatically create the subscription and send the information to your customer automatically by e-mail.
The subscription of the expired customer is automatically terminated.
The subscription of the expired customer is...
Read more about this resource...
Installation and Configuration
Downloading and Uploading
In this tutorial we will show you how to successfully install ProjectX For XUI. We will guide you step by step through the whole installation and configuration process.1. Log in to our client area and download the module.
2. In the downloaded file you might find one or two packages that support different PHP versions. In the most recent versions of the module, you will find only one package that supports PHP 7.2 and later.
3. Extract the package and upload its contents addon will be uploaded to whmcs/modules/addons xui will be uploaded to whmcs/modules/servers
The content of the package to upload should look like this.
How to License
4. In Whmcs go to "System Settings" > "Addon Modules".5. Click Activate.
6. Click Configure. eg: word or lol text or nulled only abcdefghjkk. License Key in, Check the box "Full Administrator" and click Save.
How to Configure
7 Enable "Attempt to load all files" in "Encoded File Loading" by doing this. Click "System Settings" > "General Setting" > "Other" and check the box "Attempt to load all files".8. In order to create and configure a product, go to 'System Settings' → 'Servers'.
9. Click "Create New server" and click save.
10. In order to create and configure a product, go to 'System Settings' → 'Products/Services'.
11. Click "Create New Group" and click save.
12. Click "Create a New Product".
Attachments
Last edited:


